Diapers 101: Diapering in 5 easy steps
There are a million diaper and diaper-related products on the market, and you can inevitably find someone who "swears" by each one of them. It sort of stinks to have to buy all of them yourself to try them out. So, my "Diapers 101" kit includes my take on the diapering process as well as some samples of the various products.
Step 1: Put a new diaper under current diaper, before removing current diaper
If you skip this step, be prepared to do a lot of laundry (using the handy-dandy Laundry 101 Kit mentioned below) and have a lot of stains on the bottoms of your baby clothes. [I've found that this step is very hard for some Dads to remember]
So the million-dollar question is this: what type of diaper are you going to put there? You first must choose between cloth vs. disposable. Even if you are trying to be as green as possible, this isn't an obvious answer. Cloth diapers use a LOT of water and if you use a service there are a LOT of chemicals at play. I chose disposable diapers.
The size you need coming out of the hospital (more than likely) is "N" for Newborn. If your baby is over 9 lbs, you may find it better to start with Size 1. But as you won't really know this till it happens, best to have some N's on hand. Here are my findings in testing four brands of Newborn diapers on my 7+lb. newborn:
 Pampers Swaddlers. The hospital used a flavor of Pampers, and this is what we started with. In general, we've liked these the best. They have a type of woven mesh that wicks the runny poop away from Baby; this is important if you are having diaper rash issues.
Huggies Newborn Gentle Care. At first, Pampers fit best. Then, as his shape changed, Huggies fit better. Huggies have the best elastic of all the ones we tried. They really do "hug" the baby, and they are generally a tiny bit cheaper than Pampers. But they don't have the wicking mesh.
Seventh Generation Newborn Diapers. I really wanted to use these, as they are chlorine-free. But they leaked a lot for us when we tried the N size a few weeks ago. I wrote to Seventh Generation, and they said that they were working to improve absorbency. So, I tried the #1 size last week and WHAT a DIFFERENCE. The #1's have more elastic than even the Huggies. They are super. I am not clear if the N's have been changed, too, or if they were left without elastic to make them easier to turn down to avoid the umbilical cord. Either way, the #1's get the thumbs-up from me. [I'll continue to alternate with Pampers, however, as that grid really, really helps his diaper rash]
Luvs Newborn. These didn't work for us at all. They leaked HORRIBLY; they have no elastic on them and aren't very thick. However, if you are on a budget, they are by far the cheapest of the ones we tried. Also, one woman said that every brand except this one made her baby break out in a rash. So clearly, Luvs have their place in the world of diapers.
Costco's Kirkland diapers. The smallest size that they make is size 1-2, but they are quite decent, as well. They are very similar to Huggies.
So, once you have the diaper selected (and I recommend trying diapers.com to purchase them), you are on to the next step ...
Step 2: Remove dirty Diaper
Try to wipe as much poop off as possible with the old diaper so it doesn't get on the new diaper. Then pull away old diaper, hopefully leaving baby's butt sitting on new diaper. If it slid out from under baby, try to adjust it quickly before his outfit ends up on the receiving end of something unpleasant.
Note: boys WILL pee on you. And even though people say "You can see it coming," I disagree with that ... Sometimes it is totally without warning.
Step 3: Clean baby's bottom
You have two general options for cleaning baby's little bottom: Disposable Wipes or Wash Cloths (using soap/water). Due to our issues with diaper rash, we actually use a wash cloth at home (we use an old tupperware container next to the changing stand and put warm/fresh water in it each time) and we use wipes on the road.
My recommendations:
Wash Cloth:
-- Baby Poop never comes out of cloth entirely, especially the yellow/seedy stuff if you are breast feeding. So, I recommend using one particular cloth for the butt and make sure its clear which one it is. We always use a blue cloth: Blue for Butt. And we use a yellow cloth for washing his fact and the rest of his body.
-- It is actually worthwhile to get baby wash cloths; they actually are softer than regular adult ones
 Disposable Wipes
-- We tried several different brands: be sure to get the Unscented ones, at least to start with. The all seemed generally fine
-- I liked the Seventh Generation wipes the best; they seemed the softest and as even unscented has a bit of a scent, I liked the lemony smell these had.
And then one final step/tip: if you are having severe problems with diaper rash, let baby air-dry for 5 minutes or even better blow-dry with a hair-dryer for a few seconds. (My baby loves the hair dryer!)
Step 4: Protect and/or Battle against Diaper Rash
For protecting baby's butt and preventing diaper rash, we found that putting a layer of Petroleum Jelly all over his butt works great as a first layer. The hospital nurses suggested it and they are right. Not only does it help prevent rash, it makes cleaning his bottom much easier as the poop doesn't stick to it as much. [And if you have a boy circumcised, you'll need clean petroleum jelly to put on his little wee-wee. I won't use the real word for wee-wee as I don't want my blog to get black-listed as a porn site, sigh.]
Note: You can buy Petroleum Jelly in a tub or a tube. The tube is more expensive but a lot neater/tidier to use.
For some lucky folks, just lathering up baby's butt with jelly prevents diaper rash. But for those of us not so lucky, there are a million anti-diaper rash creams on the market. I've tried several and here are my opinions of them ...
Balmex [Made in Canada]. I got a tube of this at my baby shower, from a girl who swore by it. So, I started with this. It didn't work for me at all. The rash just kept getting worse. But clearly it worked for her child, so it may work for others, too.
 Desitin, Original [Made in USA] My mother used it, my mother-in-law used it, my friends use it, my CEO uses it, and 99% of the new-moms-group in Springfield uses it. Why? Because it works. It is important to get ORIGININAL, and not the others. For example, Desitin Clear is just Desitin mixed with Petroleum Jelly, which you can do yourself, much cheaper.
-- Smith's Rosebud Salve [Made in USA]. My grandmother used this on my mother. I found that it does great to maintain a diaper-rash free bottom, but really bad cases needed the power of Zinc Oxide (e.g. Desitin). However, Smith's has the great characteristic of healing my own chapped hands. i.e. Even with having Petroleum Jelly on my hands, after 48 hours of touching Zinc Oxide every 1-2 hours, my hands were so dry and leathery that I didn't want to touch my fingers to each other. Using Smith's really helped with that.
-- Boudreaux's Butt Paste [Made in USA]. I've barely used this; I got it as a gift. It spreads very nicely but I don't like the yucky brown color. I keep it in my diaper bag.
These are the only ointments I've tried, but the list goes on and on: Dr. Smiths, Aquaphor, A&D, etc. There are a ton of them to choose from. I don't know anyone who uses any of the others, however, so I haven't been inclined to try them.
Step 5: Put on the new diaper
Most disposables have some sort of velcro-like tab to close the diaper. KEY: Make sure that the tabs are secure.
If if seems hard to make them secure, or the diaper seems tight, or you suddenly find yourself having leakage issues, it's time for a sanity check; How much does your baby weigh and what size diapers are you using? We were SHOCKED when Alexander outgrew his newborn N diapers. He was only a few weeks old. How could he POSSIBLY be already in size 1 instead of N? And yet, that is how it happened. There is actually a lot of overlap between the sizes, and they move through them quickly (NOTE! Every diaper company sizes differently in terms of weight. i.e. so a size 1 Pampers is meant for different weights than a size 1 Huggies which is different than size 1 7th Generation.)
And that's it! You've changed a diaper!
Here are a few more general tips in regards to the diaper changing station ...
- Babies LOVE mirrors. The best place for a changing station is on a dresser with a huge mirror, so baby can turn his head to look in the mirror. This is a 'crowd pleaser' from day 1.
- Be sure to get the curved changing pads that hold baby in a sort of "U" shape
- You buy covers to go on the pads, but to extend their life so you don't need more than 1 or 2 of them, lay a towel on top of it. Towels are fast and easy to toss into the laundry and wash. We had a ton of old ones from my parents, so this worked well for us.
- Put a mobile above station; try to find one with simple bright shapes rather than one with little stuffed animals. My friend gave me her old one and it has been a hit since about week 2, when he could start to see it.

In terms of packaging up my Diaper 101 Kit for a baby shower present, I'd package it in a basket. Maybe a nice rectangular one that could later be used for shelf storage. I'd include a copy of my five steps, and if the new parents registered for a diaper changing pad or cover, I might toss one of those in, too. Or, maybe toss in something fun, like the infamous "Mr. New Dad" t-shirt.
Laundry 101
The other new parent kit I might put together would be for laundry. Seem easy? Well, it still takes some assembly as baby's skin can be very sensitive to dyes, fragrances, cleaning agents, etc. Here are the pieces:
Dreft. It's been around a Loooong time. For baby's clothes. Wash all new clothes before using them.
Seventh Generation Fragrance/Dye Free Laundry detergent. For mom and dad's clothes, as baby will be leaning on them. Technically, Dreft could also be used on Mom/Dad's stuff.
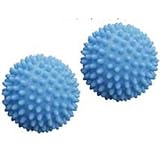
Dryer Balls. You'll want two sets: the type that fluff the laundry and the type that prevent static. These take the place of dryer sheets, which have a lot of perfume in them. NOTE: I tried using these balls for our clothes, too. They work for small stuff, but fail in loads of large items, like sheets or bathrobes. Go back to dryer sheets for these items. I've heard that tennis balls also work, but haven't tried them myself.
***
And now, I'm off to make one of these Kits for my friends who are having a baby in the summer!
1 comment:
We were on the receiving end of a beautifully packaged diaper-kit baby present from the Nitpicky Consumer, and we loved it - our baby raced through the supplies. Another favorite gift from a different friend was similar in nature but contained practical breast-feeding supplies - many not sold in drugstores - that a first-time mother would have a hard time knowing about. Both gifts were far more useful and appreciated than yet-another-baby-outfit (baby outgrows them so fast that many never get worn, it's not worth the money!).
With regard to the commentary here - 100% agreed on putting a diaper underneath, layering on petroleum jelly, pampers swaddlers and 7th generation wipes. Our baby has not needed diaper rash ointment yet thanks to this technique. We toss a cloth diaper on top every change too, to avoid getting sprayed. It should not be a matter of luck. Just hold the cloth diaper on top while changing. Sadly, although we wanted to use 7th generation diapers for all their environmental assets, the fact is they leaked irretrievably (size ones) and we will not be trying that again. Oh well.
Post a Comment